

Today we are going to look at creating a numbered list with css. In this example we will be using the counter-reset and counter-increment properties to number our list. You might be thinking, why don’t we just use the ordered list tag (<ol>), yes we could use this tag but you can’t really style the numbers very well. By using the css properties, we can add a lot more style to our numbers plus it gives us greater control to change aspects of the numbered lists.
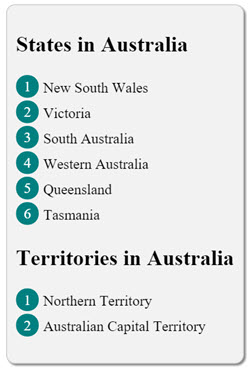
The image above is what we’ll be creating today, so lets first look at the html code that will be used.
The HTML
<div class="au">
<h2>States in Australia</h2>
    <ol>
      <li>New South Wales</li>
      <li>Victoria</li>
      <li>South Australia</li>
      <li>Western Australia</li>
      <li>Queensland</li>
      <li>Tasmania</li>
    </ol>
<h2>Territories in Australia</h2>
    <ol>
      <li>Northern Territory</li>
      <li>Australian Capital Territory</li>
    </ol>
</div>
Now if we finished here, you would still get a numbered list by using the html ordered list tag (<ol>), but the numbers would be plain and boring, by using the css counter-reset and counter-increment properties, we will be able to style the numbers with ease.
Lets now add a bit of style to our number list, we will break down the css code and go through it to see what is happening.
The CSS
ol {
  list-style:none;
  counter-reset:mycounter;
  padding:0;
}
The first part of our css code is rather straight forward, this is what is happening with each line:
list-style:none; – This will remove the basic styles associated with the ordered list tag.
counter-reset:mycounter; – The counter-reset property will reset our counter to 0 (by default), if you wanted to start the counter from a specified number, say 6, we would just add 6 to the end of our declaration, which would be, counter-reset:mycounter 6; The ‘mycounter’ is the name I have used that will define which counter needs to be reset.
padding:0; – Removes all padding from our ordered list tag.
ol li {
  position:relative;
  margin-left: 30px;
  padding:5px 0;
}
The second part of our css code will style the actual list, we could add colors here, change font-size, backgrounds and so on.
position:relative; – We need to give our list a position of relative.
margin-left: 30px; – This will move our list 30px from the left.
padding:5px 0; – Gives our list a padding at the top and bottom of 5px, left and right has no padding.
ol li:before {
  content:counter(mycounter);
  counter-increment:mycounter;
  position:absolute;
  top:0;
  left:-30px;
  width:25px;
  height:25px;
  line-height:25px;
  border-radius:50%;
  color:#fff;
  background:teal;
  text-align:center;
}
The third part is where the fun begins, this is where the numbers are added and we can style them here as well.
content:counter(mycounter); – This is the property that will actually display our number. We have used ‘mycounter’ as that is what was specified as the name above.
counter-increment:mycounter; – This property will increase our number by 1 (default), if you added another number after ‘mycounter’ such as 5, the numbers would then increment by 5 each time eg, 5 10 15 20 etc.
position:absolute; – We set the position to absolute, so that we can control where our numbers are displayed.
width and height – Sets the width and height for our number.
border-radius:50%; – Adds a radius to our number, this will give us a circle as the width and height are the same size.
color:#fff; – Our font color will be set to #fff, which is white.
background:teal; – This will set the background of our color to teal.
text-align:center; – We need this property to set our number in the center of the circle. This will set the horizontal alignment, we have used line-height to set the vertical alignment.
.au {
  display:inline-block;
  border:1px solid #ccc;
  background:#f2f2f2;
  border-radius:10px;
  box-shadow:2px 2px 2px #888;
  padding:10px;
}
I will not go through the above css code as this is only used to add a border and background color to our container.
This was just a simple example of the counter properties, there are a lot of other ways that you can use these properties and I will post another blog in the future showing some different examples.
Well that’s about it for this blog, click the button below to experiment with this code.